Table of Contents
Open Table of Contents
Résumé pour la direction
Scenario
Dans le cadre de l’évolution d’une machine virtuelle Linux hébergée sur Azure, une augmentation de capacité de stockage était nécessaire pour répondre à la croissance des besoins applicatifs et à la séparation des usages entre le système d’exploitation et les données métiers. L’objectif était double : redimensionner le disque système existant à 64 Gio et ajouter un nouveau disque de données de 64 Gio afin de disposer d’un espace dédié, plus simple à administrer et plus sûr pour les opérations futures de maintenance.
Cette intervention s’inscrit dans une logique de bonnes pratiques cloud : isoler les données du disque OS, améliorer la flexibilité opérationnelle et préparer l’environnement à des besoins de montée en charge sans refonte complète de l’instance. La persistance du montage était également un prérequis critique afin de garantir la disponibilité du volume après redémarrage.
Resolution
L’opération a été menée avec succès : le disque système a été redimensionné, un nouveau disque de données a été attaché, détecté côté système via SSH, formaté en ext4, puis monté de manière persistante sur /mnt/xfusion-disk grâce à une entrée contrôlée dans /etc/fstab.
La validation fonctionnelle a confirmé la disponibilité du nouveau volume après montage, ainsi que la conformité de la configuration avec les standards d’exploitation Linux sur Azure. La valeur métier apportée est immédiate : amélioration de la capacité de stockage, meilleure séparation des responsabilités système/données et réduction du risque opérationnel lors des redémarrages ou des maintenances.
Technical Implementation
Topology
The target design was a Linux virtual machine hosted in Azure with the following storage layout:
- OS Disk: resized to 64 GiB
- Data Disk: newly attached 64 GiB managed disk
- Mount Point:
/mnt/xfusion-disk - Access Method: SSH / headless Linux administration
This was primarily a CLI-driven and headless operation on the guest OS. Once the disk was attached from Azure, in-guest validation and configuration were performed through standard Linux commands.
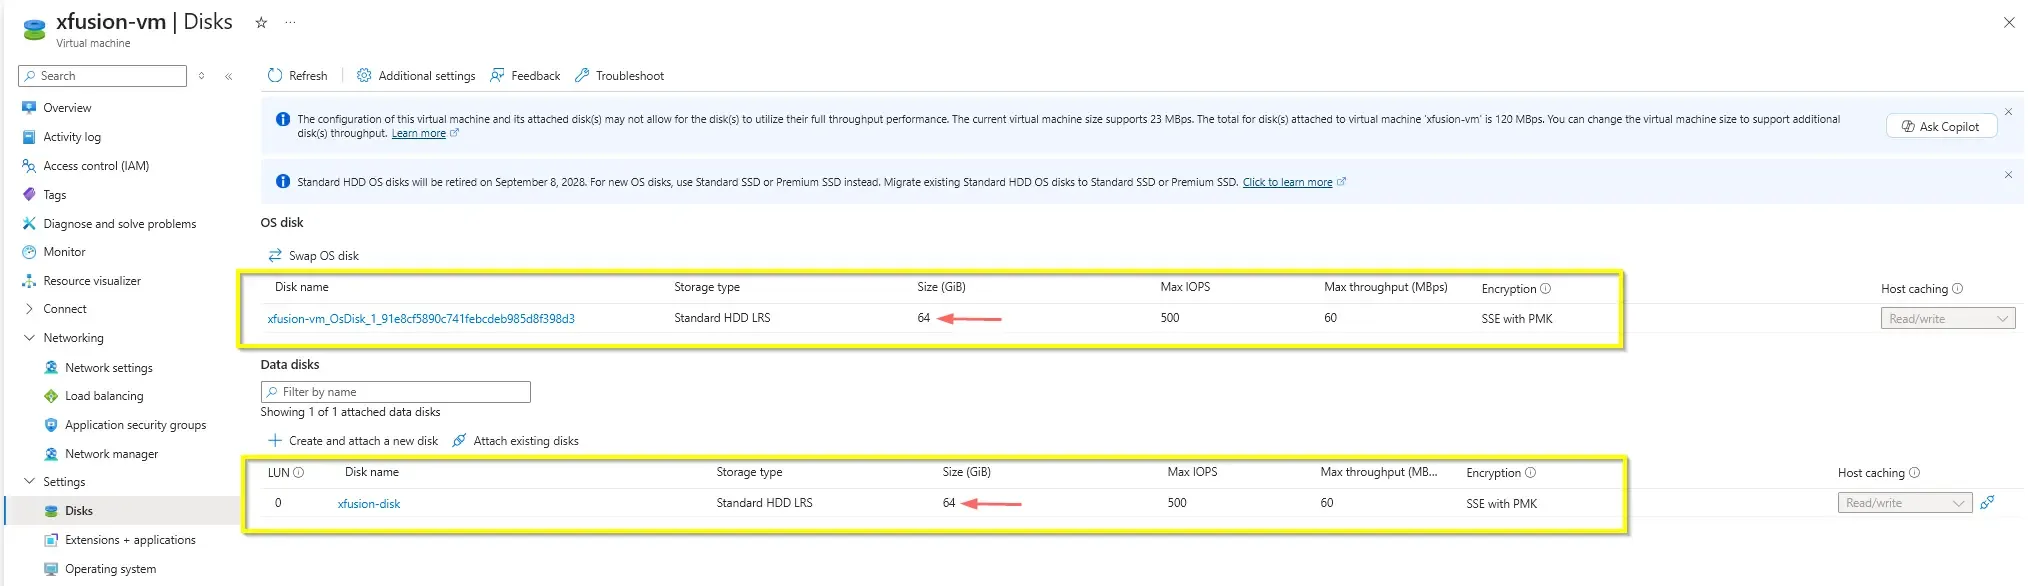
In cloud environments, newly attached disks may not appear under predictable device names across reboots or between VM families. Validation from inside the VM is required before formatting or mounting.
Architectural Insight
-
Why
lsblkis mandatory for non-deterministic cloud disk naming
In Azure and other cloud platforms, the kernel-exposed device name for an attached disk is not guaranteed to match human expectation. A newly added disk may appear as/dev/sda,/dev/sdb,/dev/sdc, or under another mapped block device depending on platform behavior, drivers, and boot-time ordering. Runninglsblkbefore any formatting step is therefore mandatory to positively identify the correct device and avoid destructive actions on the OS disk. -
Why the
nofailparameter in/etc/fstabis critical
A persistent mount entry without safeguards can prevent a VM from booting correctly if the referenced disk is temporarily unavailable, detached, or delayed during initialization. Adding thenofailoption ensures the system continues booting even if the data disk cannot be mounted at startup. This is a critical resilience measure in cloud operations, where storage attachment states may occasionally vary during maintenance, scaling, or recovery scenarios.
Formatting the wrong device is irreversible for existing data. Always confirm the target block device with lsblk before running filesystem commands.
Action
The implementation followed a simple and reliable Linux administration workflow after the Azure-side disk operations were completed.
- Connect to the VM through SSH
- Identify the newly attached disk
- Create an
ext4filesystem on the correct device - Create the target mount directory
- Mount the disk
- Persist the mount in
/etc/fstab - Validate the configuration
As shown in the terminal execution below, attempting to format the temporary disk (/dev/sdc) fails safely because the system correctly identifies it as being in use. The lsblk output guided the dynamic selection of /dev/sda for the new data volume.
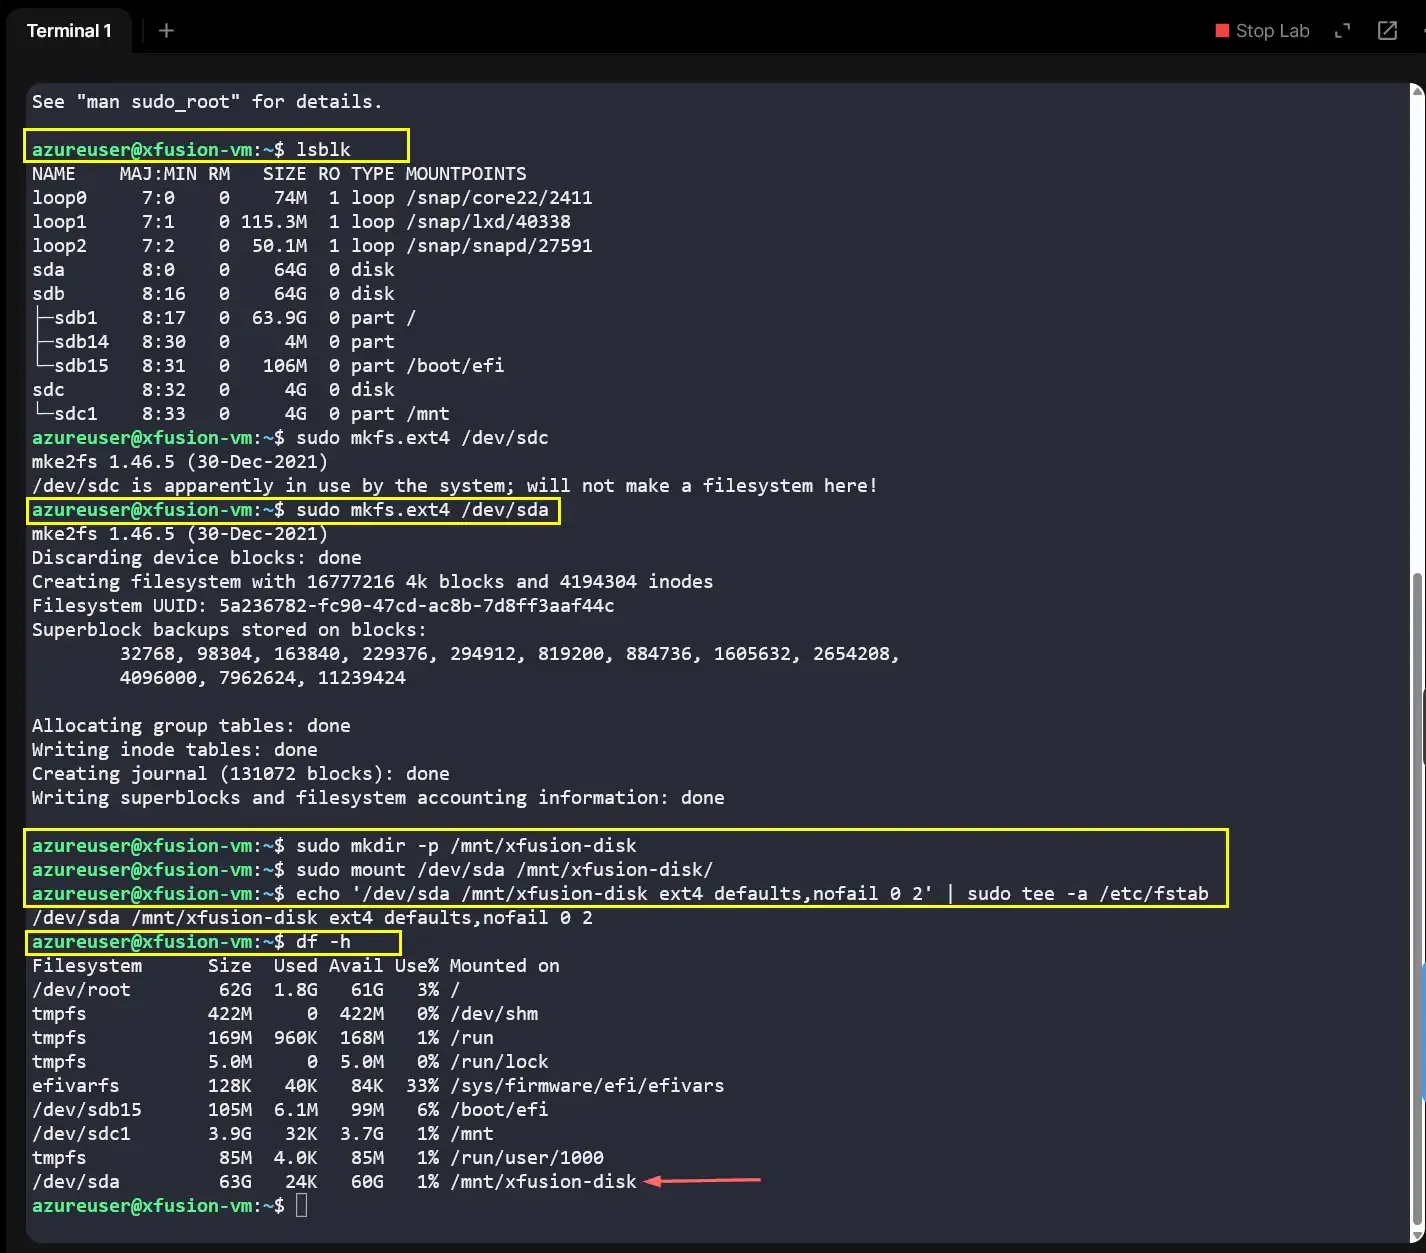
Command execution sequence corresponding to the terminal output:
lsblk
sudo mkfs.ext4 /dev/sda
sudo mkdir -p /mnt/xfusion-disk
sudo mount /dev/sda /mnt/xfusion-disk
echo '/dev/sda /mnt/xfusion-disk ext4 defaults,nofail 0 2' | sudo tee -a /etc/fstab
df -hdisk-validation-and-mount.sh
Command purpose summary:
lsblk: lists block devices and mount points to identify the correct diskmkfs.ext4: creates the filesystem on the new data diskmkdir -p: creates the persistent mount directorymount: mounts the disk immediately without rebootecho ... | sudo tee -a /etc/fstab: safely appends the persistent mount entry, ensuring it survives rebootsdf -h: validates the active mount points and capacity
A more explicit inspection step can also be used before formatting:
lsblk -fidentify-disk.shExample persistent mount entry:
/dev/sda /mnt/xfusion-disk ext4 defaults,nofail 0 2/etc/fstabUtilizing echo combined with sudo tee -a is a highly reliable pattern for appending configurations to protected system files like /etc/fstab without requiring interactive text editors, making it ideal for automation scripts.
This workflow reflects a practical transition from portal-based infrastructure changes to repeatable operational procedures executed through CLI and standard Linux system administration. In a larger environment, this exact pattern can be codified further into Cloud-Init or configuration management tools (Ansible) for consistency at scale.